| Author |
Message |
|
| mec |
 Posted: Sat Sep 20, 2008 10:27 pm Posted: Sat Sep 20, 2008 10:27 pm |
 |
|
Junior member

Joined: 09 May 2008
Posts: 19
|
|
| Back to top |
 
|
| RxmanGriff |
| Posted: Sun Sep 21, 2008 4:41 am |
|
|
Junior member
Joined: 28 Jul 2006
Posts: 26
Location: Colorado Springs, CO, USA
|
Mec,
Very impressive. After looking at your slide show I got a good laugh at the "rookie" label by your name. Wish I had your talent and equipment.
2 questions:
1) which Web cam did you use to get the necessary duration?
2) crank looks stock?! why after all the work and other parts you've gone with??
Please keep us posted with your progress.
Jerry |
|
|
| Back to top |

|
| mec |
| Posted: Sun Sep 21, 2008 8:13 am |
|
|
Junior member
Joined: 09 May 2008
Posts: 19
|
all the performance parts came from dynoman.net. he gave me the advice to use the 315 cam. I trust this will be a ggod choice. (engine will be for street/road racing use).
crank looks stock and is stock. I did not see the need for lighten or balancing the crank (the engine will run without alternator).
it was in the early 80ies, I raced this engine in an egli-framed bike. the engine is good for approx 110hp, vibration was no issue. my first attempt with 1000ccm ended with a broken stock conrod. the second try I did with RC golden rods, no problems anymore.
today I go with the carillos. reliability will be given, but no racing engine will be good for 100.000km (week point the primary drive train and fourth gear?).
mec
p.s.: maybe I will lighten and balance the crank later. but prior I have to spezialize on this work. doing all by myself is the only way to go  |
|
|
| Back to top |
|
| Satanic Mechanic |
| Posted: Sun Sep 21, 2008 7:17 pm |
|
|
 Moderator

Joined: 04 Sep 2005
Posts: 309
Location: Munich, Germany
|
Mec,
fantastic work and fantastic pictures! I see a German sticker on your lathe - any chance you are in Europe?
The 315 cam sounds like a Dynoman cam, not a Web Cam?
Please, keep up posted about your progress.
Cheers,
Axl |
|
|
| Back to top |

|
| mec |
| Posted: Sun Sep 21, 2008 8:29 pm |
|
|
Junior member
Joined: 09 May 2008
Posts: 19
|
thx,
yes, europe, austria, niederösterreich, purgstall (center of the world )
seems you are right on the cam.
degreeing in was more important than looking at the labels
the engine is ready to start. work finished yesterday.
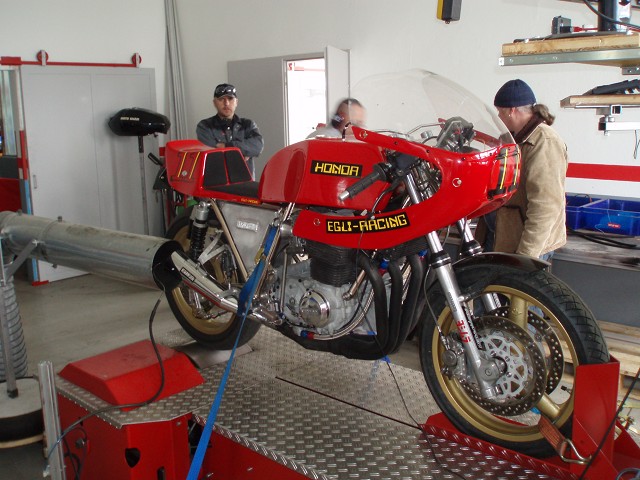
at first I planned to mount the engine in my friends egli (which I rebuild last year). but winter comes and so I am planning to build one semi egli chassis. 18" magnesium marvic wheels and a marzocchi fork with 310mm rotors will complete the projekt.
but it will take till januar/february/march to start the engine in the new rolling chassis.
I will load all pictures to my gallerie.
mec |
|
|
| Back to top |
|
| maksuttt |
| Posted: Sun Sep 21, 2008 10:02 pm |
|
|
Rookie

Joined: 11 Oct 2006
Posts: 4
Location: Canada, ON, Toronto
|
Hey, mec!
Very impressive machine shop at home (i guess?)!!! Engine looks promising!
You have a very nice tool for a valve job! I have a question about cutting depth adjustment
Ho it's done on your tool?
I have the tool which is built using the same idea (3 angle carbide cutter, Serdi cutters), but i stuck with quality of cutting because my depth adjustment does not really work... Would you mind to explain, how does it work, please? Thanks! Max
PS: I can post pictures to visualise the problem
|
|
|
| Back to top |
|
| mec |
| Posted: Sun Sep 21, 2008 10:26 pm |
|
|
Junior member
Joined: 09 May 2008
Posts: 19
|
hi maksutt,
I will try to explain:
there is a long pin fixed/mounted in the valve guide. this pin is approx 4" longer then the valve guide. in/on the top of the tool there is second pin which can precisely be fixed/adjusted in the tool. when you slide the tool onto the pin in the guide, pin and pin come in contact and gives the desired stop.
see http://www.ludwig-hunger.de/_produkte/v10/v3-vds1a.html
mec |
|
|
| Back to top |
|
| maksuttt |
| Posted: Mon Sep 22, 2008 2:09 pm |
|
|
Rookie
Joined: 11 Oct 2006
Posts: 4
Location: Canada, ON, Toronto
|
Thanks, mec!
That sounds simple:)
Do you put pressure on the tool by hand? How's quality of cutting? Do you need to lap valves after?
Sorry to ask those questions, but I was playing with my tool for a wile without any success and it seems that I found a person who can share the experience... Thanks again! Max |
|
|
| Back to top |
|
| mec |
| Posted: Mon Sep 22, 2008 3:57 pm |
|
|
Junior member
Joined: 09 May 2008
Posts: 19
|
hello,
no need to put pressure on. primarely the weight of the tool is enough. cutting the outer angle a little bit pressure is necessary.
quality is good. lapping took only a few minutes.
mec |
|
|
| Back to top |
|
| maksuttt |
| Posted: Mon Sep 22, 2008 4:53 pm |
|
|
Rookie
Joined: 11 Oct 2006
Posts: 4
Location: Canada, ON, Toronto
|
Thank you!
That's the inspiration which i needed:)
The knurled ring, which is between upper support and cutting head - what is the purpose? Thanks! Max
 |
|
|
| Back to top |
|
| mec |
| Posted: Mon Sep 22, 2008 7:29 pm |
|
|
Junior member
Joined: 09 May 2008
Posts: 19
|
when you rotate the tool, the cutter rotates depending on your justage of the cutter.
when you rotate the tool fixating the knurled ring, the cutter rotates and moves continuately a 45° angle.
mec |
|
|
| Back to top |
|
| Deer Slayer |
| Posted: Sun Oct 19, 2008 5:17 am |
|
|
Junior member
Joined: 30 Oct 2007
Posts: 15
Location: Howell Michigan
|
I saw all the sleeves being made on the lathe, but how do you finish them off?? Do you have a DIY method, or do you send the jug out for honing once the sleeves are in?? I've got 2 lathes, and 2 mills (big and little). The only things I've done is lighten up my alternator, and make an oil pressure guage adapter. I plan on making up some new lowering blocks out of stainless when I go to put my new rear shocks on. I don't really like the way the ones that are on there are made. VERY IMPRESSIVE!  |
|
|
| Back to top |
|
| mec |
| Posted: Sun Oct 19, 2008 6:32 pm |
|
|
Junior member
Joined: 09 May 2008
Posts: 19
|
@ deer slayer,
yes, I sent the cylinder to a profi for honing, once I had the sleeves in the block.
mec |
|
|
| Back to top |
|
| mec |
| Posted: Sat Mar 21, 2009 6:12 pm |
|
|
Junior member
Joined: 09 May 2008
Posts: 19
|
hello,
after 30 minutes runtime the engine was ready for dyno testing.
dyno test was interrupted by a dead spark plug (a new NGK 9 iridium one). we had to rejet the carbs twice and went with 132 mainjets, needle one position down.
the result:
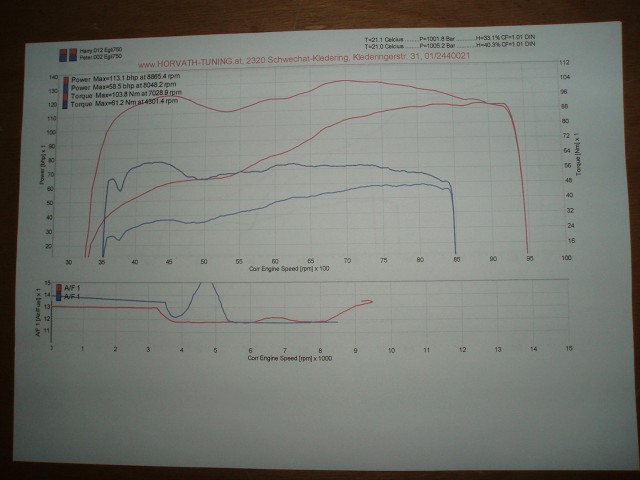
113 rear wheel HP at 8860rpm
max torque 104Nm at 7029rpm
the blue curve (for comparison) is a stock 750 K2 engine with velocity stacks and 4:1 racing exhaust.
mec |
|
|
| Back to top |
|
| fang |
| Posted: Tue Mar 24, 2009 2:01 am |
|
|
 Junior member
Joined: 19 Oct 2005
Posts: 23
Location: Austin, Texas, USA
|
Spectacular work. Thank you for sharing your progress. I am nearly finished with a similar project -- I damaged a piston during installation (went with the old Henry Abe 900cc pistons), but have a replacement on the way. I did not go with the fancy charging system.
Beautiful machine!
-steve |
|
|
| Back to top |
|
|
|